The QPP NextGen Adapter for Quark XML Author allows you to create and manage a branch of a document or a component from the following places on the user interface:
Create a Branch
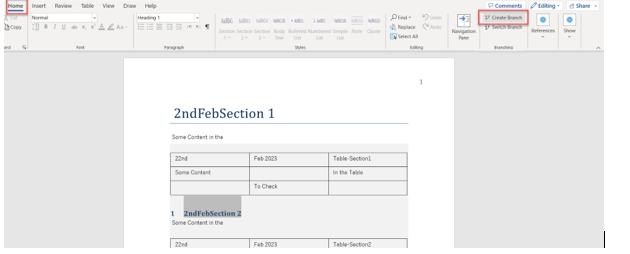
The option to create a branch is available at the following locations:- The Home ribbon to create the branch of an asset
- The Navigation pane to create a branch of a section in the asset through the kebab menu icon next to the section

- The Smart Document pane to create a branch of a linked reference in the asset through the kebab menu icon on the listed component

The process to create a branch is the same for the assets, sections, and components, which is as follows:
- Select the button or context menu option Create Branch (based on where you are on the user interface) to open the dialog Create Branch.
- In the dialog Create Branch, provide a name for the branch in the field Branch Label.
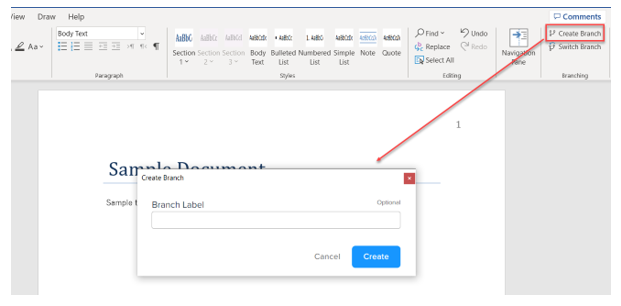
Note: The field Branch Label is optional. When you do not provide a name for the branch, QPP NextGen automatically assigns a number to the branch. For more information, see the section branch number assignments.
3. Select the Create button to save the new branch on the server.
To switch or change the branch:
QPP NextGen for Quark XML Author provides the option to switch a specific branch along with the option to create a branch. To see the position of the option on the user interface, refer to the section Create a Branch. The icon for Switch Branch is  .
.
Additionally, you can switch the branch of an asset or component while opening or importing it from the server through any of the insertion dialogs such as Open from Server, Select Template, Replace from Server, and so on.
To switch and select a branch in an insertion dialog: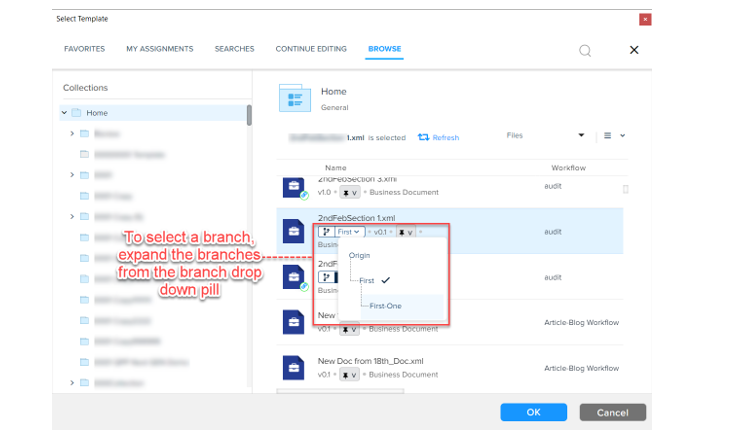
To switch and select a branch on the authoring canvas user interface: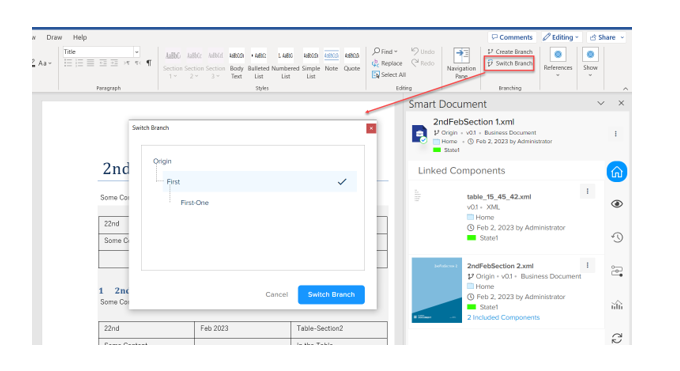
.Additionally, you can switch the branch of an asset or component while opening or importing it from the server through any of the insertion dialogs such as Open from Server, Select Template, Replace from Server, and so on.
To switch and select a branch in an insertion dialog:
- Select the dropdown menu icon on the branch information pill element to expand the list of branches available for the asset.
- Select the branch you want to switch to.
To switch and select a branch on the authoring canvas user interface:
- Select the button or context menu option Switch Branch (based on where you are on the user interface) to open the dialog Switch Branch.
- In the Switch Branch dialog, select the branch you want to switch to and then select the button Switch Branch.
Priyanka Bhotika
Comments